Oracle Grid Infrastructure 12c Standalone Installation Step by Step

In this article, we have a discussion of the configuration steps for oracle 12c grid infrastructure. Grid installation on the standalone database server is also known as Oracle Restart. This is required if you wish you use the ASM file system with the Oracle restart feature. Oracle Restart Means, During any accidental Hardware or software failure, it will start the database components like database instance, listener service, and ASM instance automatically. Here there won’t be any OCR or VOTING disk.
Oracle 12c grid infrastructure minimum RAM requirements
====================================
Minimum RAM:8 GB
Swap Space: equal to RAM
===================================
The below steps are going to show as follow
1. Adding Disk in Vmware
2. Partition the disks
3. Prerequisite For Grid Installation
4. Grid Software installtion
===================================
Step 1. Adding Disk group in Vmware
===================================
Disk adding in Vmware steps are given below.


Here, we provide the steps for adding hard disk and following process we can add more hard disk as our requirement.
===============================
Step 2: Partition the disk
===============================
# Check adding disk using following OS command
fdisk -l
# Disk add in partition table using following command (highlighted in red are the inputs during configuration)
[root@oracleasm ~]# fdisk /dev/sdb (/dev/sdb -- newly added disk name)
Welcome to fdisk (util-linux 2.23.2).
Changes will remain in memory only, until you decide to write them.
Be careful before using the write command.
Device does not contain a recognized partition table
Building a new DOS disklabel with disk identifier 0xfcfea6bd.
Command (m for help): n
Partition type:
p primary (0 primary, 0 extended, 4 free)
e extended
Select (default p): p
Partition number (1-4, default 1): 1
First sector (2048-10485759, default 2048):
Using default value 2048
Last sector, +sectors or +size{K,M,G} (2048-10485759, default 10485759):
Using default value 10485759
Partition 1 of type Linux and of size 5 GiB is set
Command (m for help): w
The partition table has been altered!
Calling ioctl() to re-read partition table.
Syncing disks.
Note: following the same process we add /dev/sbc and /dev/sbd disk
=======================================
Step 3. Prerequisite For Grid Installation
=======================================
# Edit /etc/sysctl.conf add following entries to set kernel parameters
fs.aio-max-nr = 1048576
fs.file-max = 6815744
kernel.shmall = 2097152
kernel.shmmax = 4294967295
kernel.shmmni = 4096
kernel.sem = 250 32000 100 128
net.ipv4.ip_local_port_range = 9000 65500
net.core.rmem_default = 262144
net.core.rmem_max = 4194304
net.core.wmem_default = 262144
net.core.wmem_max = 1048576
net.ipv4.ip_local_port_range = 9000 65500
# /sbin/sysctl -p
# adding below data in the /etc/security/limits.d file
oracle soft nofile 1024
oracle hard nofile 65536
oracle soft nproc 16384
oracle hard nproc 16384
oracle soft stack 10240
oracle hard stack 32768
oracle hard memlock 134217728
oracle soft memlock 134217728
# Required packages are given below
# OL6 and OL7 (RHEL6 and RHEL7)
yum install binutils -y
yum install compat-libcap1 -y
yum install compat-libstdc++-33 -y
yum install compat-libstdc++-33.i686 -y
yum install glibc -y
yum install glibc.i686 -y
yum install glibc-devel -y
yum install glibc-devel.i686 -y
yum install ksh -y
yum install libaio -y
yum install libaio.i686 -y
yum install libaio-devel -y
yum install libaio-devel.i686 -y
yum install libX11 -y
yum install libX11.i686 -y
yum install libXau -y
yum install libXau.i686 -y
yum install libXi -y
yum install libXi.i686 -y
yum install libXtst -y
yum install libXtst.i686 -y
yum install libgcc -y
yum install libgcc.i686 -y
yum install libstdc++ -y
yum install libstdc++.i686 -y
yum install libstdc++-devel -y
yum install libstdc++-devel.i686 -y
yum install libxcb -y
yum install libxcb.i686 -y
yum install make -y
yum install nfs-utils -y
yum install net-tools -y
yum install smartmontools -y
yum install sysstat -y
yum install unixODBC -y
yum install unixODBC-devel -y
# Package for oracleasm
yum install oracleasm-support
## Add user and group for grid installation
[root@oracleasm ~]# groupadd -g 54325 asmdba
[root@oracleasm ~]# groupadd -g 54328 asmadmin
[root@oracleasm ~]# groupadd -g 54329 asmoper
[root@oracleasm ~]# groupadd -g 54330 install
## Add user grid for grid installation
[root@oracleasm ~]# useradd -u 54322 -g oinstall -G asmdba,asmadmin,asmoper grid
[root@oracleasm ~]# passwd grid
## Configure oracleasm (highlighted in red are the inputs during configuration)
[root@oracleasm ~]# oracleasm configure -i
Configuring the Oracle ASM library driver.
This will configure the on-boot properties of the Oracle ASM library
driver. The following questions will determine whether the driver is
loaded on boot and what permissions it will have. The current values
will be shown in brackets ('[]'). Hitting <ENTER> without typing an
answer will keep that current value. Ctrl-C will abort.
Default user to own the driver interface []: grid
Default group to own the driver interface []: asmadmin
Start Oracle ASM library driver on boot (y/n) [n]: y
Scan for Oracle ASM disks on boot (y/n) [y]: y
Writing Oracle ASM library driver configuration: done
## Check configuration
[root@oracleasm ~]# /usr/sbin/oracleasm configure
ORACLEASM_ENABLED=true
ORACLEASM_UID=grid
ORACLEASM_GID=asmadmin
ORACLEASM_SCANBOOT=true
ORACLEASM_SCANORDER=""
ORACLEASM_SCANEXCLUDE=""
ORACLEASM_SCAN_DIRECTORIES=""
ORACLEASM_USE_LOGICAL_BLOCK_SIZE="false"
## Create directory and give permission for grid
[root@oracleasm ~]# mkdir -p /u01/app/12.2.0/grid
[root@oracleasm ~]# mkdir -p /u01/app/grid
[root@oracleasm ~]# chown -R grid:oinstall /u01/app/12.2.0/
[root@oracleasm ~]# chown -R grid:asmadmin /u01/app/12.2.0/
[root@oracleasm ~]# chmod -R 775 /u01/app/12.2.0/
## Bash profile
export ORACLE_SID=+ASM1
export ORACLE_BASE=/u01/app/grid
export ORACLE_HOME=/u01/app/11.2.0.4/grid
export PATH=$ORACLE_HOME/bin:$PATH:$HOME/bin:/usr/local/bin
export TEMP=/tmp
export TMP=/tmp
export TMPDIR=/tmp
## Run the below command
/usr/sbin/oracleasm init
# Create disk using following command
oracleasm createdisk DISK1 /dev/sdb1
oracleasm createdisk DISK2 /dev/sdc1
oracleasm createdisk DISK3 /dev/sdd1
# Check the created disks
cd /dev/oracleasm/disks
ls -lrt
=============================
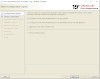
Step 4. Grid Software installtion
=============================
Download the grid software from oracle site then upload the software into the server where we want to install grid. Unzip the software into grid_home using following command
unzip grid_software -d GRID_HOME
Exmple: unzip linuxx64_12201_grid_home.zip -d /u01/app/12.2.0/grid
Go to the cd /u01/app/12.2.0/grid (GRID_HOME -- /u01/app/12.2.0/grid)
./gridSetup.sh


Post a Comment
0 Comments