Oracle Database Upgrade 12c to 19c with Physical Standby Database Using DBUA

In this article, we show the procedure to upgrade the oracle database 12c to 19c with the physical standby database using DBUA. Standby physical database will be upgraded through redo applying from the primary database and there is no need to rebuild the physical standby database after upgrading the primary database. Upgrade procedure details are as follows.
Primary & Standby Database Activities:
Step 1: Install oracle software only in both the primary & standby database server
Create a new database home for both primary and standby databases. Unzip the database into the new 19c home and install the software only RDBMS.
# mkdir -p /u01/app/oracle/product/19c/db_1
# chown -R oracle:oinstall /u01/app/oracle/product/19c/db_1
# chmod -R 775 /u01/app/oracle/product/19c/db_1
Unzip the software to the new 19c home using the following command
Unzip Oracle_19.3_Linux_x86-64_DB_V982063-01.zip -d /u01/app/oracle/product/19c/db_1
# cd /u01/app/oracle/product/19c/db_1
# ./runInstaller
Primary Database Activities:
Step 2: Check the Invalid Objects if there have any invalid objects compile them before the upgrade.
As a prerequisite, it Is recommended to check for invalid objects. If there have any invalid objects validate the invalid objects.
$ sqlplus / as sysdba
SQL*Plus: Release 12.2.0.1.0 Production on Thu Jan 5 16:12:57 2023
Copyright (c) 1982, 2016, Oracle. All rights reserved.
Connected to:
Oracle Database 12c Enterprise Edition Release 12.2.0.1.0 - 64bit Production
$ SQL> select count(*) from dba_objects where status='INVALID';
Step 3: Create the required directory where store the upgradation script
# mkdir -p /u01/spool/preupgrade -- Primary database
# chown -R oracle:oinstall /u01/spool/preupgrade
# chmod -R 775 /u01/spool/preupgrade
Step 4: Execute the Pre-upgrade script in the primary node only
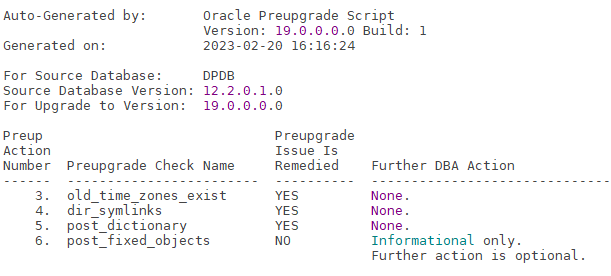
In the below screenshot, we have executed the preupgrade.jar from the 19c Oracle Home. The
preupgrade.jar output provides pre and post-upgradation recommendation fixup SQL script. The pre
and post-upgradation fixup SQL scripts can be located in the directory location as created above. In the
output, we also get the command to run the pre and post-fixup steps.
# /u01/app/oracle/product/12c/db_1/jdk/bin/java -jar /u01/app/oracle/product/19c/db_1/rdbms/admin/preupgrade.jar FILE DIR /u01/spool/preupgrade/

Carefully check the preupgrade.log log and fixup the issues before preceding the upgrade.
Output:
==============
BEFORE UPGRADE
==============
REQUIRED ACTIONS
================
None
RECOMMENDED ACTIONS
===================
1. (AUTOFIXUP) Gather stale data dictionary statistics prior to database
upgrade in off-peak time using:
EXECUTE DBMS_STATS.GATHER_DICTIONARY_STATS;
Dictionary statistics do not exist or are stale (not up-to-date).
Dictionary statistics help the Oracle optimizer find efficient SQL
execution plans and are essential for proper upgrade timing. Oracle
recommends gathering dictionary statistics in the last 24 hours before
database upgrade.
For information on managing optimizer statistics, refer to the 12.2.0.1
Oracle Database SQL Tuning Guide.
INFORMATION ONLY
================
2. Check the Oracle Backup and Recovery User's Guide for information on how
to manage an RMAN recovery catalog schema.
If you are using a version of the recovery catalog schema that is older
than that required by the RMAN client version, then you must upgrade the
catalog schema.
It is good practice to have the catalog schema the same or higher version
than the RMAN client version you are using.
ORACLE GENERATED FIXUP SCRIPT
=============================
All of the issues in database DPDB
which are identified above as BEFORE UPGRADE "(AUTOFIXUP)" can be resolved by
executing the following
SQL>@/u01/spool/preupgrade/preupgrade_fixups.sql
Step 6: Perform the recommended actions as per preupgrade log.
SQL> EXECUTE DBMS_STATS.GATHER_DICTIONARY_STATS;
SQL> @/orasoft/spool/preupgrade/preupgrade_fixups.sql
Step 7: Enable flashback in both primary and standby databases and create a restore point
If the flashback is not enabled first enable the flashback database in both the primary and standby database using the following procedure as well as keep enough free space in db_recovery_file_dest.
SQL> ALTER SYSTEM SET DB_RECOVERY_FILE_DEST_SIZE=60G;
SQL> ALTER SYSTEM SET DB_RECOVERY_FILE_DEST='/u01/oraflash/';
SQL> alter database flashback on;
Now create the guarantee restore point in both primary & standby databases.
Primary DB:
SQL> create restore point before_upgrade_19c_PG guarantee flashback database;
SQL> select name from v$restore_point;
NAME
--------------------------------------------------------------------------------
BEFORE_UPGRADE_19C_PG
Standby DB:
SQL> create restore point before_upgrade_19c_DG guarantee flashback database;
SQL> select name from v$restore_point;
NAME
--------------------------------------------------------------------------------
BEFORE_UPGRADE_19C_DG
Step 8: Shutdown the standby database and defer log archive destination
SQL> alter system set log_archive_dest_state_2=DEFER SCOPE=BOTH;
Standby database:
SQL> shut immediate;
Stop the listener
# lsnrctl stop
Step 9: Copy the listener, tns, and password file 12c database to the new 19c database.
Start the listener as 19c database steps are as follows.
# export ORACLE_HOME=/u01/app/oracle/product/12c/db_1
# export PATH=$ORACLE_HOME/bin:$PATH;
# lsnrctl stop
# export ORACLE_HOME=/u01/app/oracle/product/19c/db_1
# export PATH=$ORACLE_HOME/bin:$PATH;
# lsnrctl start
Step 10: Set the new 19c database environment
# export ORACLE_HOME=/u01/app/oracle/product/19c/db_1 (19c database home)
# cd $ORACLE_HOME/bin
./dbua

Action: Click the Next button

Action: No error is found and the showing message is the post-upgrade recommendation. If there have any error messages resolve the error before going to the following windows. Click the following button.

Action: Click the next button

Action: We created a restore point before preceding the upgrade and here we use the restore point and click the next button.

Action: Use the existing listener and click the next button

Action: Click the next button

Action: This is the summary window, if found all are okay click the Finish button.

Action: Check the alter log to see what is happening if arise any error messages carefully read and solve the issue.

Action: Upgrade is completed successfully.
Post Upgrade Tasks
Step 1: Verify /etc/oratab and check if ORACLE_HOME location has changed to 19c home
# cat /etc/oratab |grep -i DPDB
Step 2: Verify the time zone and invalid objects
SQL> SELECT version FROM v$timezone_file;
VERSION
----------
32
SQL> select count(1) from dba_objects where status='INVALID';
COUNT(1)
----------
0
Step 3: Verify DBA_REGISTRY
SQL> col COMP_ID for a10
col COMP_NAME for a40
col VERSION for a15
set lines 180
set pages 999
select COMP_ID,COMP_NAME,VERSION,STATUS from dba_registry;

Step 4: Run postupgrade_fixups.sql, this script already ran by DBUA under the post-upgrade section. However, we have executed it again
SQL>@/orasoft/spool/preupgrade/postupgrade_fixups.sql
Step 5: Once the upgrade is completed successfully and all are found okay then you can drop the restore point.
SQL> col name for a20
SQL> col GUARANTEE_FLASHBACK_DATABASE for a10
SQL> col TIME for a60
SQL> set lines 190
SQL> select NAME, GUARANTEE_FLASHBACK_DATABASE, TIME from V$restore_point;
NAME GUARANTEE_ TIME
-------------------- ---------- ------------------------------------------------------------
BEFORE_UPGRADE_19C_PG YES 22-FEB-23 11.45.22.000000000 AM
SQL> drop restore point BEFORE_UPGRADE_19C_PG;
The restore point dropped.
Step 6: Update the COMPATIBLE parameter
Note: After the upgrade, the database has to be tested properly before updating the compatible parameter. Once the parameter is updated database cannot be downgraded.
SQL> show parameter compatible;
NAME TYPE VALUE
------------------------------------ ----------- ------------------------------
compatible string 12.2.0
SQL> alter system set compatible='19.0.0' scope=spfile;
SQL> shutdown immediate;
SQL> startup;
SQL> show parameter compatible;
The database has been successfully upgraded to 19c.
SQL> select name, open_mode, version from v$database, v$instance;
NAME OPEN_MODE VERSION
-------------------- -------------------- ---------------
DPDB READ WRITE 19.0.0.0.0
Standby Database Activities:
Step 1: Copy the listener, tns, and password file to the new 19c database home location
# cd $ORACLE_HOME/ network/admin - 12c home
# cp listener.ora tnsnames.ora /u01/app/oracle/product/19c/db_1/network/admin - 19c home
# cd $ORACLE_HOME/dbs
# cp orapwDPDB /u01/app/oracle/product/19c/db_1/dbs
Stop the listener and export the 19c home and start the listener
# lsnrct stop
# export ORACLE_HOME=/u01/app/oracle/product/19c/db_1
# export PATH=$ORACLE_HOME/bin:$PATH;
# export ORACLE_SID=DPDB_STBY
# lsnrctl start
# lsnrctl status
Start the database from 19c home
SQL> STARTUP MOUNT;
Check the network check
# tnsping DR_TNSNAME
# tnsping DC_TNSNAME
Primary database Activities:
# tnsping DR_TNSNAME
# tnsping DC_TNSNAME
Log archive destination enable in the primary database
SQL> alter system set log_archive_dest_state_2=ENABLE scope = both;
Standby Database Activities:
Check database mode and role using the following command
SQL> select open_mode, database_role from v$database;
Start the recovery manager in the standby database
SQL> ALTER DATABASE RECOVER MANAGED STANDBY DATABASE USING CURRENT LOGFILE DISCONNECT;
The physical standby database will be upgraded through the redo apply.
Check the redo log and apply details using the following query.
SQL> select process, status, thread#, sequence#, block#, blocks from v$managed_standby;
Done!


Post a Comment
0 Comments